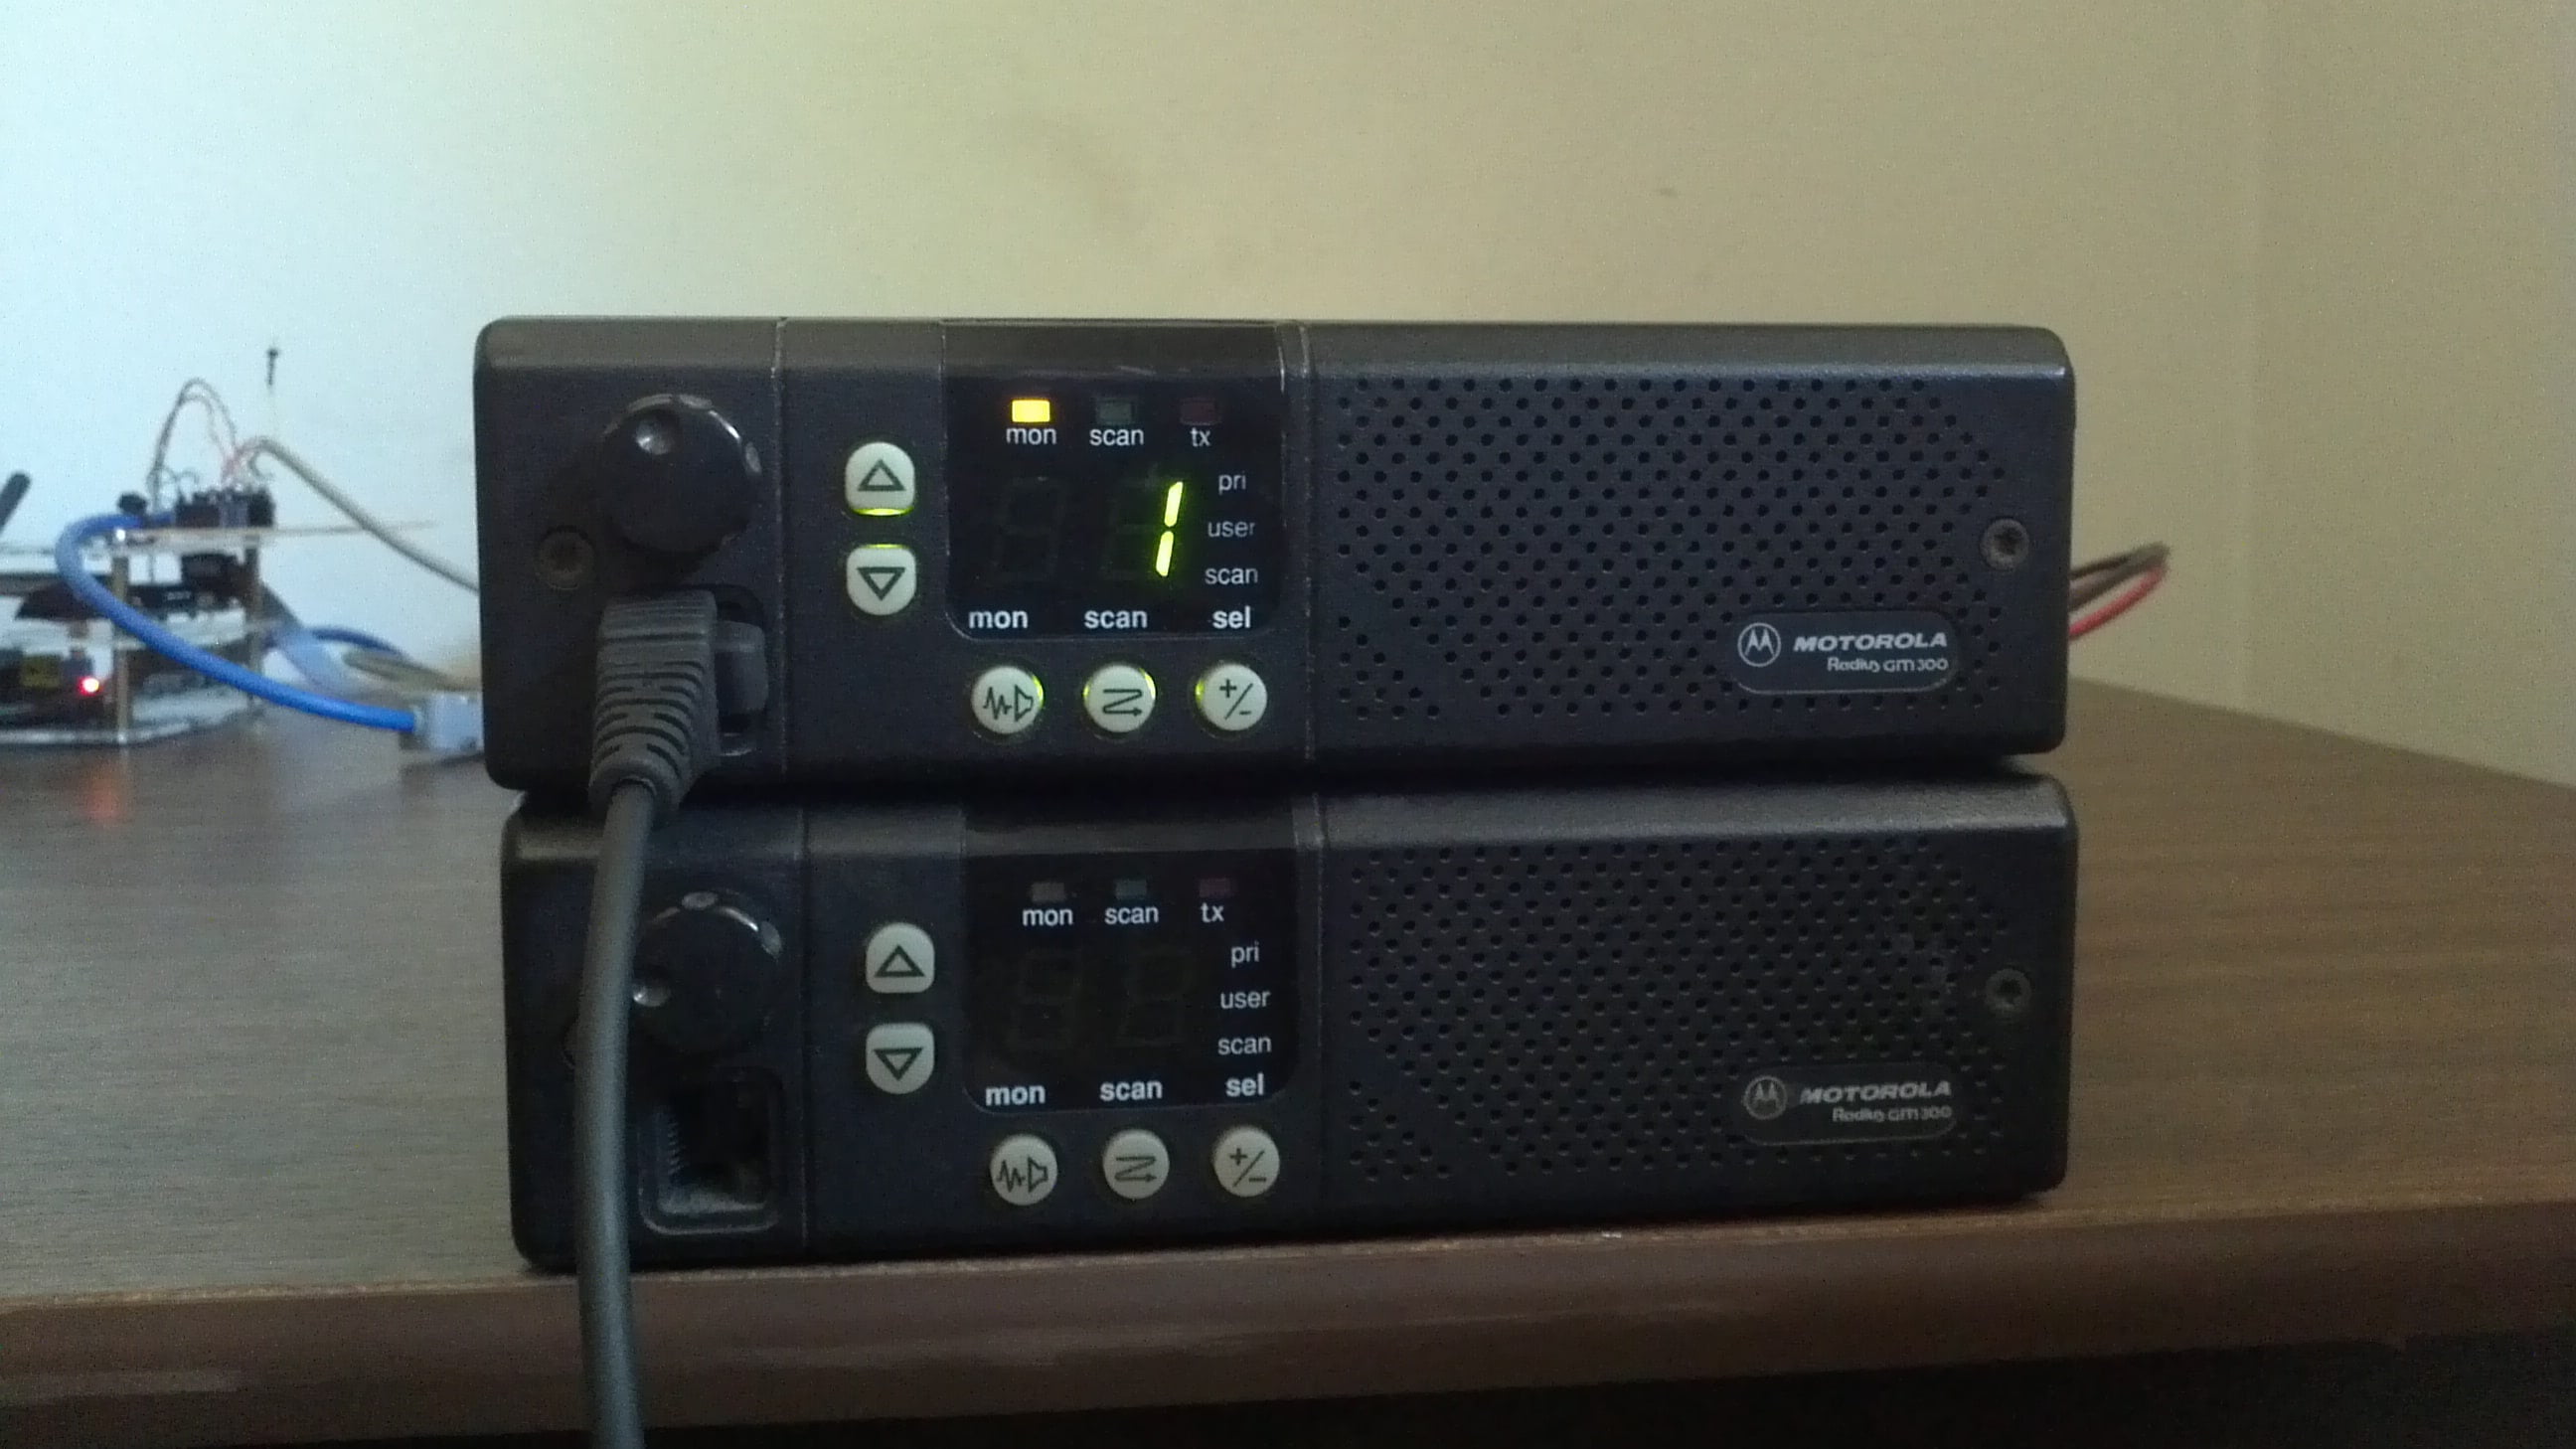
Programming the Motorola Radius
Programming the Motorola Radius was not easy to learn. It took me about a week to figure out how to accomplish this dreadful task. Let’s jump right in and start programming your Motorola Radius series (GM300/GR300/M10/M120/M130) radio!
Cables Required to Program the Motorola Radius
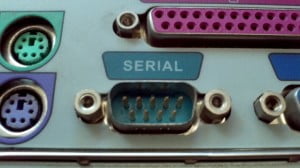
The cables and connectors required to program your Motorola Radius will vary from computer to computer. If you have a newer model computer, chances are that you do not have a serial port. If you have an older model computer, you are probably in luck.
To see if you have a serial port on your computer, look at the connections for a port labeled “Serial”. It will have nine pins and look like the picture.
If you do have a serial port, you do not need to purchase the USB Serial Port Adapter listed below.
Recommended Cables & Connectors
Listed below are the recommended programming cables and connectors required to program the Motorola Radius. I have received a few conformations from others that they do work as expected.
- RIB for Motorola – https://amzn.to/2OsHVrD
- Power Supply for RIB – https://amzn.to/2AO1PK4
- Radio Programming Cable – https://amzn.to/2RzrQSQ
- USB to Serial Port Adapter – https://amzn.to/2Dp4koy (only needed if you don’t have a serial port connection on your computer)
Other Cables & Connectors
There are other programming cables that may or may not work to program your Motorola Radius. It is best to use the recommended cables and connectors listed above.
WARNING! – Some cheap USB serial port adapters do not work to program your Motorola Radius. I had to trash two different USB serial port adapters before I found one that worked for me.
Getting Setup to Program the Motorola Radius
The first thing you need to do is get your hardware setup. Plug in your USB Serial Port Adapter to your computer. Attach the Motorola RIB to the USB Serial Port Adapter. Finally, attach the programming cable to the RIB and your transceiver.
Note: If you have an existing serial port on your computer, just plug your Motorola RIB to the computer and the Motorola programming cable to the RIB and your transceiver.
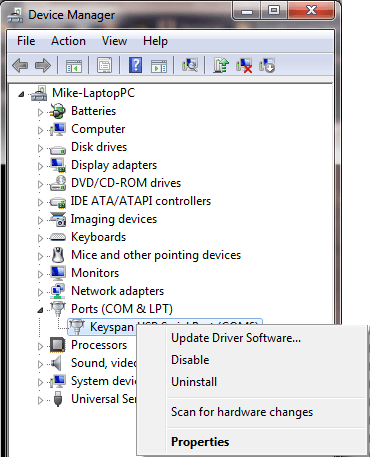
We now need to make sure that the USB Serial Port Adapter has been assigned port COM1 or COM2. This can be accomplished by checking the Device Manager. The Device Manager can be accessed by bringing up the Start Menu and typing “Device Manager” in the Search Programs and Files area.
How to Change the COM Port Number
If you plugged in your USB Serial Port Adapter and a COM port other then COM1 or COM2 was assigned in the Device Manager, follow the steps below.
Step #1 - (Changing the COM Port Number)
Open the “Device Manager”.

Step #2 - (Changing the COM Port Number)
Right click on the USB Serial Port and select Properties.
Step #3 - (Changing the COM Port Number)
Click the “Port Settings” tab, and then select the button labeled “Advanced”.
Step #4 - (Changing the COM Port Number)
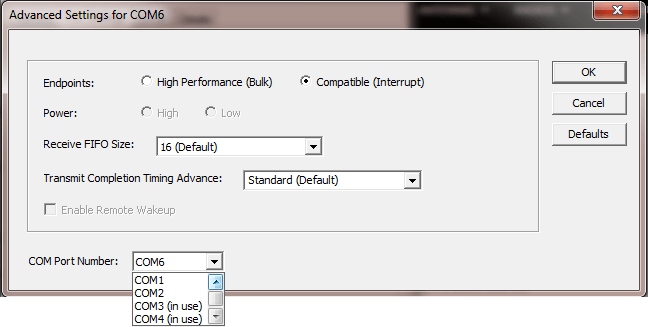
Click the drop-down menu from where it says “COM Port Number” and select “COM1” or “COM2”. Then click “OK” to save.
Note: If COM1 and COM2 are both in use, you must select one of them. It will give you a warning that the port was opened by another application, and may have an unpredictable effect (on the other application). You must select “Yes”.
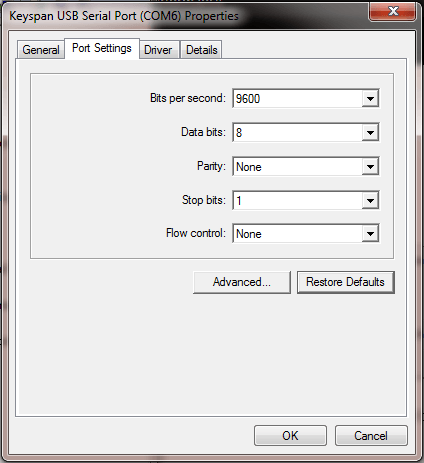
Adjusting the COM Port Settings
The COM Port Settings will need to be adjusted in order to communicate with your Motorola Radius.
Step #1 - (Adjusting the COM Port Settings)
If you are not already there, open the “Device Manager”, right click on the USB Serial Port and select “Properties”.
Step #2 - (Adjusting the COM Port Settings)
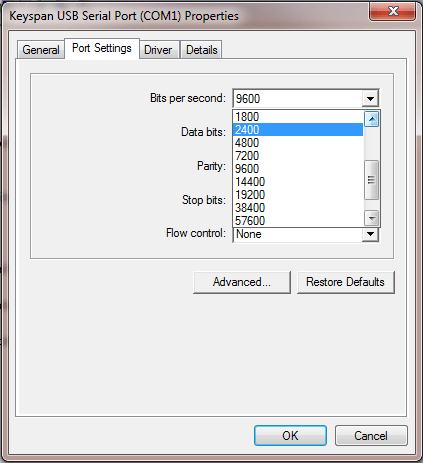
Click the “Port Settings” tab, and then change the “Bits per second” drop-down menu to 2400.
Step #3 - (Adjusting the COM Port Settings)
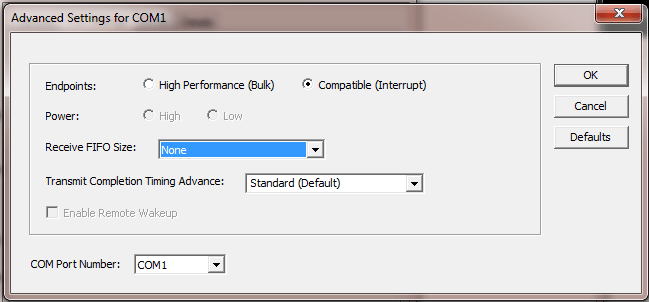
(You might not have to do this step. If you have problems, change this back to the default setting.) Click the “Advanced” button and change the “Receive FIFO Size” setting to “None” from the drop-down menu.
Step #4 - (Adjusting the COM Port Settings)
Confirm and close both boxes by clicking “OK”.
Configuring DOSBox to Run Motorola RSS
Now it’s time to configure DOSBox to run the Motorola RSS program. If you have not done so yet, download and install the DOSBox program. (Download link)
Step #1 - (Configuring DOSBox for Motorola RSS)
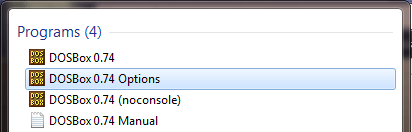
Click the “Start Menu” and in the “Search Programs and Files” area, type and select “DOSBox Options”.
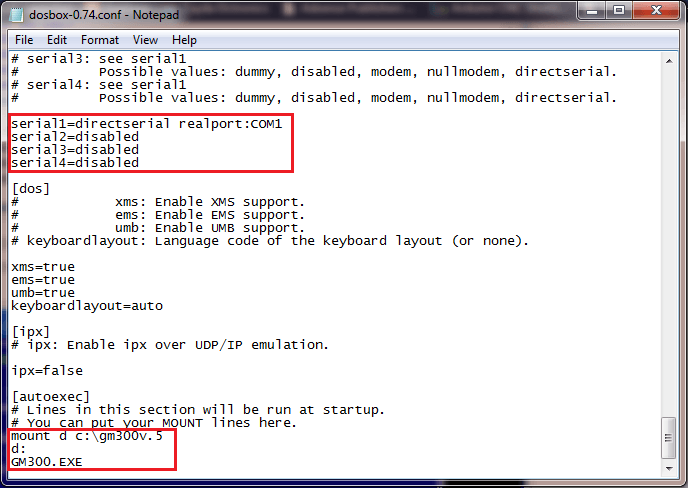
Step #2 - (Configuring DOSBox for Motorola RSS)
Your default text editor will open with the DOSBox conf file. Change the the conf files “serial” settings to:
[serial]
serial1=directserial realport:COM1
serial2=disabled
serial3=disabled
serial4=disabled
Note: Make sure if you are using COM2 that you change the above to:
[serial]
serial1=directserial realport:COM2
serial2=disabled
serial3=disabled
serial4=disabled
Step #3 - (Configuring DOSBox for Motorola RSS)
Change the the conf files “autoexec” settings to:
[autoexec]
mount d c:\gm300v.5
d:
GM300.EXE
Step #4 - (Configuring DOSBox for Motorola RSS)
Save the DOSBox conf file and exit your text editor.
Starting Motorola’s Radio Service Software
Now it’s time to see if we did so far is correct. Let’s start DOSBox and see what happens. You should see a welcome screen that tells you to push any button, and then the following screen below.
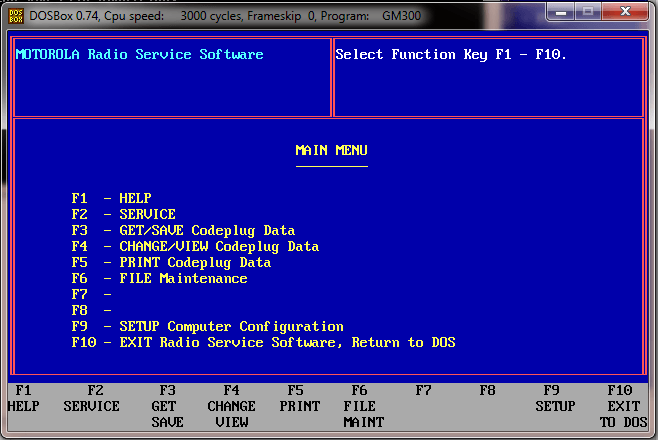
If you see this screen above, congratulate yourself! You have successfully configured DOSBox to run Motorola’s Radio Service Software.
Now comes the part that just about everyone has trouble with . . . getting your Motorola Radius to communicate with your computer. Cheap programming cables, and too fast of a CPU speed (on your computer/DOSBox) are the main cause of this problem. We already discussed what cables worked for me. Now let’s go over how to slow down the CPU speed.
Slowing Down the CPU Speed in DOSBox
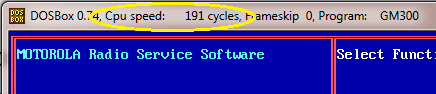
While DOSBox is running, hold down the “Ctrl” key and press “F11” until the CPU Speed (displayed in the title bar) reaches somewhere around 191 cycles. If you went too far, hold down the “Ctrl” key and press “F12” to raise the speed back up. I was able to successfully program with a CPU Speed of up to 400 cycles.
Configuring and Testing the Motorola RSS
Now it’s time to configure the RSS, and test the connection between your computer and your Motorola Radius.
Step #1 - (Configuring and Testing the Motorola RSS)
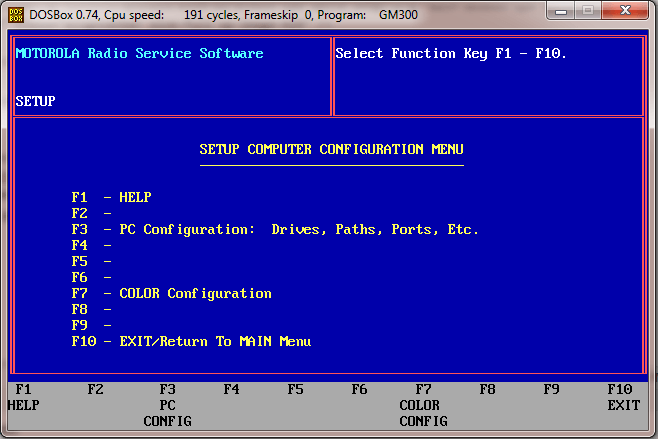
From the “Main Menu” of the Motorola RSS, press “F9” to get into the “Setup Computer Configuration Menu”.
Step #2 - (Configuring and Testing the Motorola RSS)
Now press “F3” to go into the “PC Configuration Menu”
Step #3 - (Configuring and Testing the Motorola RSS)
You will need type in the “Default Path Names” on this screen.
DEFAULT PATH NAMES
Archive D:\ARCHIVE
Backup D:\BACKUP
Repeater D:\REPEATER

SERIAL PORTS
RIB . . . . . . . . . . . . . . . COM1
Note: If you are using COM2, make sure to change the “RIB” setting to COM2.

Step #4 - (Configuring and Testing the Motorola RSS)
Now press “F8” to save your settings.
Step #5 - (Configuring and Testing the Motorola RSS)
Press “F3” to perform a “COMM TEST”. This is where you will find out if your computer and your radio will be able to communicate. Look to make sure you get the “Radio Communications OK” message. If you get any error messages, double check everything above, and make sure all the settings are correct.
Programming Frequencies, Tones, Offset, and the Time Out Timer
In this section, I will show you how to program frequencies, tones, offset, and the time-out-timer.
Step #1 - (Frequencies, Tones, Offset, and the Time Out Timer)
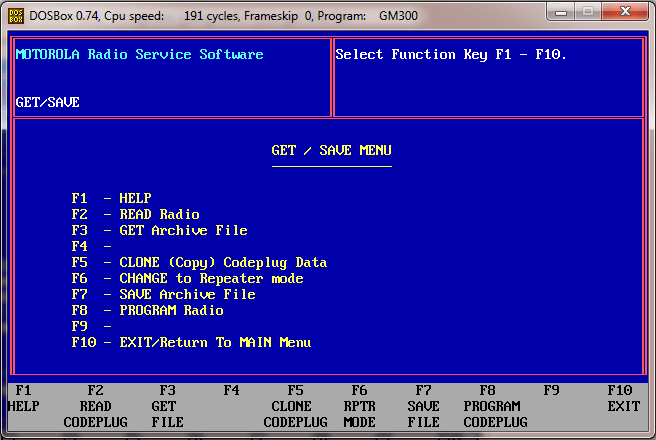
If you are not at the Main Menu, press “F10” until you get there. Press “F3” to “GET/SAVE Codeplug Data”.
Step #2 - (Frequencies, Tones, Offset, and the Time Out Timer)
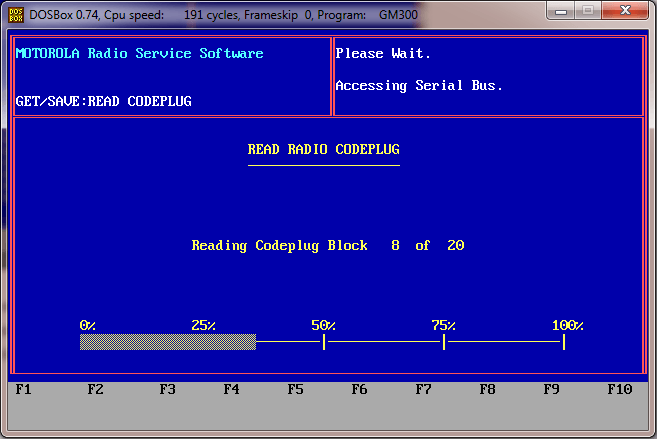
Now press “F2” for the “READ Radio” option.
You should now see a screen that looks like the one pictured below.
Step #3 - (Frequencies, Tones, Offset, and the Time Out Timer)
After the reading of the codeplug block is complete, press “F10” and then “F4” to get to the “CHANGE/VIEW Codeplug” menu. Now press “F5” to get into the “MODE Configuration: Frequency, Squelch Type, and Codes” menu.
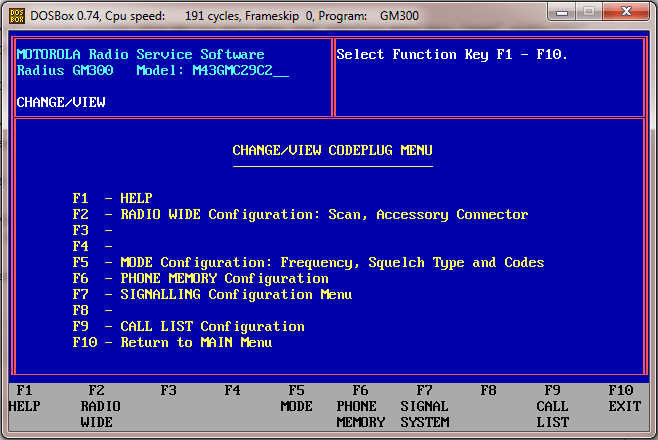
Step #4 - (Frequencies, Tones, Offset, and the Time Out Timer)
This is where you can change the frequencies, PL tones, offset, and time-out-timer. Change the settings to what you require.
Note: The “Tab” key will navigate you around in this menu, and “F4” will take you to the next channel settings.

Step #5 - (Frequencies, Tones, Offset, and the Time Out Timer)
Press “F10” twice to return to the “Main Menu”.
Step #6 - (Frequencies, Tones, Offset, and the Time Out Timer)
Now press “F3” and then “F8” to select the “PROGRAM Radio” option. A warning screen will appear. Press “F2” to continue programming your Motorola Radius.
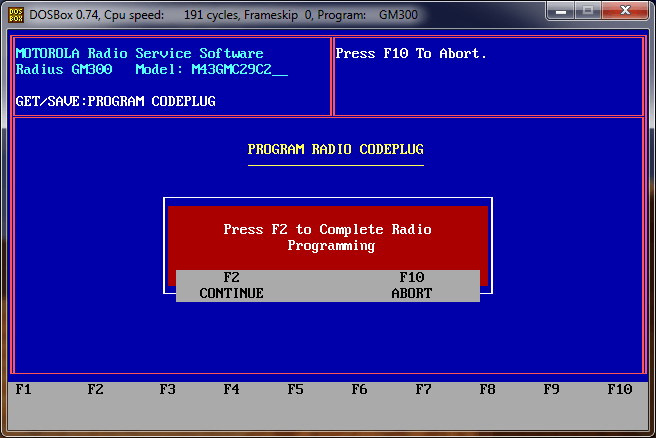
This is the screen (below) that you will see when your Motorola Radius is programming.
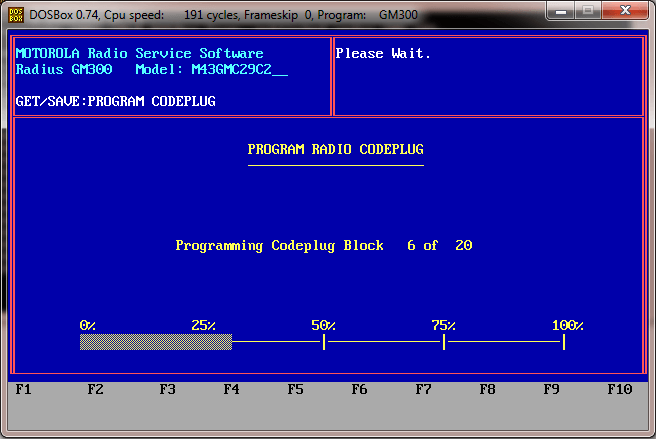
Step #7 - (Frequencies, Tones, Offset, and the Time Out Timer)
Celebrate! You have programmed your Motorola Radius!
Notable Resources
- A good source of information about Motorola Maxtrac / Radius / GM300 radios is at the repeater-builder.com website.
- Common RSS error codes (and what they mean) for the Radius series transceivers.
- Find used Motorola Maxtrac / Radius radios on eBay.
I have heard that turning the transceiver off and back on again (power cycle) just before attempting to initiate communication from the computer has helped, for some people.
I need a little help I have followed all the steps up to the comm test. I have tried the comm test and get ‘Accessing Serial Bus.” but it stays on that. I don’t get an error or anything else. I even tried reading the codeplug and got the same message. Reading codeblock does not come up. I even left it there for 10 minutes. I using a computer with Windows Vista Business. Thanks in advance for any help.
What cable(s) are you using? If you are using cheap cables that’s where you will get stuck. The only cable(s) that I have found to work are the ones mentioned in the article. If you have those exact cables, try changing the CPU cycles (probably up in your case being it’s an older Vista computer). Hope that helps.
The cable is probably the problem. I did order a programming cablf withe the serial plug off of eBay but I think it was one of the cheaper ones. I clicked on the link for programming cables on your site and it sent me to one on Amazon that was sold out.
That really stinks! You will probably have to just do what I did and keep ordering different cables until you find one that works. Try to search for GM300 RIBless cable schematics if you are capable of modifying your current cable, or even better – build your own RIB and “dumb” cable. The RIB is a lot better way to go.
I haven’t gotten my new cable yet but I tried changing a couple of setting on my computer and not it is giving me “#7 INVALID OPP CODE” when I try to read the radio. When I just do the COMM TEST it gives me that error for a second then tells me Radio Communications good. Is there a setting that needs changing or do you know anything about that? Thanks for your help and Thank you for this site too.
I have had good luck building my own cables. A chunk of Cat 5, an RJ45 end and a DB 15 (or 9, depending on the rib).
Adding to my last comment I had switched it from COM1 to COM2 in all the settings above because it was giving me that at first when I switched it to COM2 that is when it wouldn’t do anything. I had forgotten what the error was because it flashed up too quick that is why I didn’t include it in my first question.
Try to Get/Save Codeplug Data (F3) > Read Radio (F2). If that works, you succeeded. Don’t drive yourself crazy when there’s a good chance it’s the cable.
http://www.batlabs.com/codes.html
I am having the same issue as Joseph. I wonder if it’s the programming cable because I also got a cheap one off Amazon.
KK6JYT – your reccomended cable is STILL out of stock on Amazon. Do you a have a different one to reccomended or does some one else know of one that ACTUALLY works?
I don’t have the time (or knowledge) to build a cable.
73
Sorry, I do not know of one that is in stock and works. I will update the listing as soon as someone can verify a good cable.
Same issues here as with others. Error 7. Dell E5500 w native com port, tried DOSBox, boot to DOS, etc. Only thing that worked for me was a Maxton model RPC-MM RIB-less cable loaned to me. Works perfectly. I just ordered this one as the photo shows same cable we shall see – https://amzn.to/2JBJOl4
I got the above referenced cable today and it works perfectly.C
I followed your advice and also was now able to program both of the radios I have with no problems or issues. This cable WORKS!
(short URL to the cable on Amazon)
https://amzn.to/2JBJOl4
The multicable from KaWaMall works fine. The only problem I have had is getting it to save to my archive file. It says “Path does not exist”.
If it’s the first time saving that file then that will pop up, since there’s no such file created yet. Go ahead and save it anyway and that will fix the problem.
Another reason this can happen is the drive letter not being correct for how the drive was mounted. For example, if I mount my D: drive as the C: in DOSbox, I have to make sure the path I set corresponds to that and set the path as going to drive C:, not drive D: (because DOSbox will change it to the correct drive when it comes through).
nice, i do the same via DOSBox for Radius GP300 (old type) via Homemade MAX232 Com/TTl programmer (http://batlabs.com/images/mrib.gif) and it works fine on P4 2Ghz CPU.
For GP300 with LCD and keyb, the sw R05.03.00 (r other versions ) does not work , i have 057 on the lcd when pressing 2 sidekeys and PTT at turning on the TRX. Do i need other sw for this GP300 2T/DTMF version? or other start-up keys to press ?? vy73
mike on6jf
GM300.EXE illegal command is the prompt I’m getting
Try to change it to this:
mount d c:gm300.exe
I updated the post.
First, my compliments on a great resource you’ve created here. Your work on it is much appreciated. Second, like many others here I’m also encountering the “Error #7 INVALID OP CODE” problem. The PC I’m using is one I built myself, specifically for amateur radio, so it does have a native serial port. The cable is from KJ6ZWL, as is the RSS software. Under Win 7 and the latest DOSbox I get the error flashing on the screen very briefly and then the “Radio Communications OK” message when testing the comms. Attempts to read the radio result in the same error displayed and failure. At the same time, in the DOSbox status window I’m seeing a serial port error that the RX buffer overflowed. This makes me believe the problem is a handshaking issue, that either the radio or the computer is not pausing when it should. I’ve tried experimenting with the handshaking (XON/XOFF, hardware, none) to no effect, but this was with DOSbox and RSS running, so changing the settings without exiting and restarting DOSbox may not have any effect. I’ll experiment further and report back. It would help a lot though to know what ALL of your port settings are set at, not just baud and FIFO. Regarding FIFO, Windows 7 advanced settings do no permit setting RX to zero. It uses sliders and RX is 1-14 (because that’s the size of the buffer in the UART chip) and the TX buffer is 1-16 characters. You can untick the checkbox, which would turn off the buffering completely, but that does not seems to have any effect on this problem (so far).
I’m having the exact same problem. Did you find a solution?
Thanks to all ““““good guys
Just an update to my previous post:
I did what Clifford (above) did and ordered the same cable he did from Amazon. It arrived today and, with no other changes to the system, read and programmed both radios without a problem. Evidently, there is a problem with some programming cables, even ones that aren’t cheap junk from China (mine was from KJ6ZWL – custom made) but this one from Amazon works beautifully!
https://amzn.to/2JBJOl4
i have error #2 aknowledge how to fix it
I read code plug sm50 Radius. I used win 8.1 or win 10, dosbox and Tripple-lite cable usa-19sh. I didn’t meet any problem. No power cycle needed. When I used prolific usb serial cable, I had to power cycle between read/write code plug.
Thanks for your advices on this blog.
if your going to use it very often..just build a DOS computer from an old 486 etc……you can also change cables and do EF JOHNSON…DO IT RIGHT AND YOU DON’T NEED BOOT DISKS!…….
I have maxtrac lab, gm300/m120, sm50/120, and one of the ef Johnson rss,,all on an old 486….works great….had to go old school to get the hard drive right, but now just turn it on and program!!!!
TKS so consegui Programar um GM 300 gracas as sua dicas
não há de quê
I appreciate the shout out :).
73s! KF5RRX.
Thanks for the post!
TIP: Once you figure out the CPU speed that works for you it can be saved into the configuration file in the cpu section:
[cpu]
cycles=fixed 191
I am Getting “no acknowledgment” when trying to read my radio. Running windows 10 with dos box. any ideas
Hello Michael:
I am using DOSBox on my Windows computer. I have a known working RIB box. I’m trying to read a Radius M208. I also have the correct RSS ver R07.20.01. I have DOSBox configured to use COM1. DOSBox starts my RSS perfectly. I use the CNTRL F11 and F12 keys to adjust the CPU to about 275. Now when I run the COM TEST it responds perfectly with RADIO ACESS OK. Now when I go to read the radios codeplug I get the status bar and the computer attempts to read the radio but after a minute or less I start seeing Overrun RX errors on my DOSBox window. After reading about Overrun RX issues I tried playing with the FIFO buffers by first turning it off, by adjusting for various settings, and still get the overrun errors on RX. I also set the COM1 port to 2400 baud, 8, N, 1.
Not sure what else to try. Can you send some light on what else I might need to do?
Thanks for any help!
73’s
Jeff
WB8REI
Try adding rxdelay=200 to your [serialports] section in the DOSBox configuration file. Increase or decrease the number if 200 doesn’t work to see if it helps.
rxdelay: How long (milliseconds) to delay received data if the interface is not ready. Increase this value if you encounter overrun errors in the DOSBox Status Window. Default: 100
https://www.dosbox.com/DOSBoxManual.html
Thanks for the suggestions Michael, I will try them out.
Jeff
Thanks Michael!
I set the CPU to 191 cycles and added the “rxdelay=200” and I am now able to read the codeplug! Just wrote new codeplug to radio and checked out radio with service monitor, ALL GOOD! I really appreciate you taking the time to respond so quickly. I was going to give up when I decided to send you the e-mail with my issue, sure glad I did!
Thanks again,
Jeff
Excellent! Glad I could help.
Hi, where exactly did you paste the rxdelay=200? I’m having similar problems programming the GR300.
In the DOSBox Options file. The file name will be something like “dosbox-0.74.conf”. Read the section above labeled “Configuring DOSBox to Run Motorola RSS” to see how to get to that file.
Getglitched seems to have gone 🙁 cannot find the software to program a GM900
I do not know if the software source is safe, but you can try to find it here – http://www.hackersrussia.ru/Radio/m_motorola.php
I can read the codeplug but I get error 58 and have had no luck on fixing it….. Any Help on this ?
The error might be because the model number is for an 8 channel but there are 16 frequencies programmed and it is confusing the software. You may have to use a hex editor to make it look like a 16 channel. Check out this link – http://batboard.batlabs.com/viewtopic.php?t=28352
I am trying to program a GM300 with a 486 laptop, RSS, and known good RIB, as I have programmed my Jedi series radios with no problem. I am getting an error message, . I have more than one Radius (M120), and have the same issue with all.
What error are you getting and at what point are you getting the error?
I’ve got an LRA radius that won’t program. Dosbox -> usb to serial = code 2 no response.
Dosbox on windows XP with a real com port gives the invalid optcode error. Radio doctor gets somewhere but then it errors and says “com port already open”
Thing is, I see the TX light of the cable going and this cable using the same USB to serial adapter programmed an M1225 just fine. I also get RX and TX overruns on dosbox XP no matter how high I set both delays. The radio is getting the commands because I hear it beep. Completely lost 🙁
That’s a tough one. Look at this page and try some of the different settings in the configuration file.
https://www.dosbox.com/wiki/Configuration:CPU
Got it done on XP with no dosbox. CPU speed was around 2ghz which goes to show that on some radios this setup will not be needed with a newer 90s RSS.
EXCELLENT! Thanks for the update.
Good job on not giving up. Persistence is the key to success.
Hi!,
Thanks for the tutorial , i have followed the procedure careful, but when i reach a stage of reading a radio i got an error #7 serial bus error. Any help on how to fix it
Error 7 is a Serial Bus Error that can be:
You can try to use a different COM port, check that your connections are good/solid, or use better/different cables. If it’s not the COM port, I’d be willing to bet that it’s your cable.
Hi, im trying to use the I20R RSS, but am having a strange issue. If I use vDos, navigate to the drive and run i20r.exe it works great, however vDos doesn’t support serial ports so thats no good to me.
If i do the same in DosBox following your instructions, navigate to the directory, run i20r.exe, it wont load the program. The dos window just sits there with a blinking _ symbol and wont let me type at all… Thoughts?
Hello,
Thanks very much for the Information.. i am trying to install a Motorola GP900 Software from a CD through DosBox, so i am getting the Message “Can’t open the Runtime.odb File” when i try to run the Runtime.exe! does anyone have an Idea what can i do??
Thanks
Ok here is my experience with programming a Gm300 with dosbox. According to the setup procedures in most blogs say to set you cycles to 191. For some this works for others this dose not work. However with that said what does work regardless of where the cycles are set (default is 3000 when set to auto), you need to set you serial port in windows manager to 1200 baud and that your reboot your computer after that. Also I would set you cputype in dosbox options to 386_slow.
A dos programming computer uses a slow running 386 processor and the serial port is running at 1200 buad 8 bit no parity.
After firing up doxbox running 3000 cycles I am able to program a gm300 with no issues.
I have just received used Radius GM 300 and a programming cable . I do not have software to program . How can I get the software.
I have gone through your thorough setup and am at at roadblock. I can run setup using the GS300 software and when I select #2 to test communications, a screen flashes so fast i can’t read it and then a screen says Communications successful COM2 (or something like that.
Then back to the main menu and I select “Read Radio”. Then i get an error msg – “Serial Bus Error – #2 No acknowledge”.
I’m using a USB to serial RJ-45 converter plug as there are no DB-9’s on this laptop. It uses a Prolific Chipset.
I’ve slowed down the CPU to 191.
Gone into the DosBox and added the line RXDELAY=200
Still get that error msg.
Is there a certain Prolific driver that works better than others?
Thanks
I have gotten DosBox set up with the Motorola software.
AM using a USB to serial converter cable using the Prolific Chipset.
Set up for using COM Port #2
All performs correctly until i Test Communications. Immediately I see an error flash onscreen but immediately I get a message saying Radio communications OK but getting an error message on DosBox Status Window.
Error:Framing 1, Parity 0, Overrun RX:0 , TX:0, Break 1
I’ve slowed the processor down to 191 and also added RXDELAY=200
When i try to Read Radio i get error “Serial Bus Error #2 No Acknowledge
Is this a cable issue?
can I use this to program my GTX?
I believe so. You just need to find the correct programming software.
I had a friend send me this link because h eknew I had been fooling with a GTX900 mobile for weeks and having these same problems. I never knew you could adjust and set dosbox the way you demo’d. I have my radio over with a friend who is going to program or at least program. I just wish I had oen of these writeups on the GTX before I wasted so much time. I look forward to trying these tips when I get my radio back
Hi just wondering if you had a chance to try this same concept out with a Motorola HT1000 portable.
Also is it ok to use the standard Motorola R.I.B. along with the Motorola R.I.B. to computer interface cable along with a Motorola programming cable?
I have an old radius M120 model M43GMC20A2AA. It uses a 16 pin connector at the radio end. What cable is used for this radio? I have an old vista computer that can be used.
Dear sir,
I have the GM-300 software running on an old DOS computer. I use it to program my two GM-300 16 Channel Radios.
Please tell me if the GM-300 software will work with the Motorola Radius Radios. I used to have the disc with all the software’s on it, but I have misplaced it. If the GM-300 software won’t work, do you have a copy of the Radius software you could share.
Greatly appreciated
Thanks!
Mike
N9EWS
I had been programming my radios with a very old (c 1992) laptop that was still running DOS. Well, finally the hard drive died and it was time to find a new.
Many hours spent on my Win11 laptop w DOSBOX, trying all different setting and always getting the “Invalid OpCode Error”.
This was using a 10 year-old ribless cable that always work with the old laptop.
Bought a new cable on Amazon for $18.99. Plugged it in and it worked the first time:
https://www.amazon.com/dp/B0BFF76ST4?psc=1&ref=ppx_yo2ov_dt_b_product_details
This cable worked without having to change any port setting (9600/8/N/1), buffers enabled at defaults, and DOS BOX set to auto (3000 cycles). It just works. Don’t waste your time trying to get an old cable to work.
I had been programming my radios with a very old (c 1992) laptop that was still running DOS. Well, finally the hard drive died and it was time to find a new way.
Many hours spent on my Win11 laptop w DOSBOX, trying all different settings and always getting the “Invalid OpCode Error”. This was using a 10 year-old ribless cable that always worked with the old laptop.
Bought a new cable on Amazon for $18.99. Plugged it in and it worked the first time:
https://www.amazon.com/dp/B0BFF76ST4?psc=1&ref=ppx_yo2ov_dt_b_product_details
This cable worked without having to change any port settings (9600/8/N/1), buffers enabled at defaults, and DOS BOX set to auto (3000 cycles). It just works. Don’t waste your time trying to get an old cable to work.
I have a GP300, a RIB less cable and DOSBox running the GP300 program. I am getting the #2 Opcode error. I set the CPU speed to 191. What should the BAUD rate be for the USB-RS232 adapter? The article says 9600 for the GM300 but someone else said 2400 for the GP300. What should it be>
Thank You!